
After finding myself with a barn to work in and needing a new work bench for said barn, with the fact I have built a couple of my own and helped others make them as well, (and as I was building mine at the same time so I’d like to give a nod to Stevil over at AHTBM)… I decided to document my efforts. Of course this all happened months ago, and seein’ as I’m sitting here getting fat not riding cuz I busted a rib, I figured this would be a good time to write it up.

Materials list:
- 13 8ft 2×4
- 1 4×8 sheet of 3/4inch BC plywood
- 1 4×4 sheet of ½ BC plywood
- Big ass box of 2 -1/2inch deck screws
- Small ass box of 2inch deck screws
First off, make sure the wood you buy is straight. Hold it at one end and look down the length of it turning it over a couple times to make sure it isn’t bowed or twisted. If you try to use bowed or twisted wood, your bench will be a piece of shit. We’re not here to build a piece of shit, alright. Although it can be impossible, find lengths of wood that have little to no knots as they can be a huge pain as well.
As of right now, my table saw is on the other side of the country in my father’s barn, so I had the Orange Store rip the 4×8 plywood into two 2×8 sheets… even though I have done it before, I wasn’t about to put forth the effort to rip it with a hand saw.
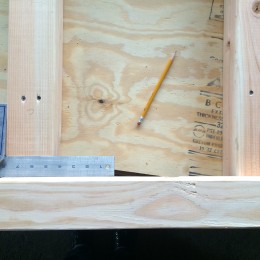
I use a carpenters square to insure straight lines, and I also used a cordless drill because I did.


Measure and mark everything with a pencil so if you want to finish it with stain and make it pretty for whatever reason you can erase your marks if they are in the wrong place, or you don’t cut a straight line… pens are stupid for wood working and so are sharpies. Measure and mark the entire 2×4 before you begin cutting so there won’t be a knot in your way.


Make sure you have something to support both ends of the wood you are cutting so it doesn’t crack and splinter. You can use a box, a loved one, or obedient dog, whatever, just use something.
So after you have measured and cut and cleaned up after yourself, because you should clean up and not leave a mess, you should have this:
- 4 – 8ft 2×4
- 7 – 21inch 2×4
- 8 – 40inch 2×4
The 8footers are for the length, the 21inchers for the depth, and the 40inchers for the height. Why 40inches you ask? As far as I am concerned, a proper workbench height is 1inch lower than your elbow when your arm is bent at 90 degrees (at the elbow). This is so you can work with small stuff and intricate stuff without bending over to reach it and also makes it perfect to lean on when admiring the cool stuff you make on your new work bench. It also puts your vice and truing stand in really good spots assuming you have a vice and truing stand. I do. So from my elbow to the ground is 41inches, and since I am adding a 3/4inch top to it, 40 – 3/4inches is all but perfect.

Yes, there are two 2×4’s left over, one is for if you fuck up, and the other for the tool wall which in my case is basically just two 4footers screwed to the back of the 4×4 sheet of plywood which is screwed to the side of the barn. Keep in mind, buying an extra 2×4 is cheaper than getting pissed off while going back to the store for one stupid 2×4, and even cheaper if you’ve been drinking while working. Plus, if you are skilled enough to build this bench an extra 2×4 or two sitting around is a good thing, and it’s the same reason you buy too many screws.
The next step is making the legs. Butt two 40inch 2×4’s (or whatever length you have decided to be the height of your bench) together nice and square, then drill pilot holes for the 2-1/2inch screws using a drill bit that is the same size as the part of the screw inside the threads. If you use one smaller, it will be a giant pain in the ass. If you use one bigger, well then it won’t hold and your bench will be a piece of shit. Make sure to put these pilot holes about six inches from whatever side will be the top, and about two inches from whatever side will be the bottom – so when you start to add braces there aren’t screws in the way.


Also, make sure that the drill bit is long enough to go all the way through the top 2×4 and into the second one so you can line them up properly. Finish drilling the pilot holes into the bottom 2×4 without going all the way through, but if you do it is ok unless you care about what is underneath. If you are worried about it, just reset the drill bit so it will go about ¾ of the way through, which will be enough. Also, make sure to mark the pairs of legs that become one with some sort of marking that shows orientation so your holes will line up. I simply used A,B,C,D… but you can draw elephants, dicks, a caricature of your mother in law, whatever. Just make them obvious and useful.


Now screw that shit together.

Now you are ready to put the sides on. Take two legs and two of the 21inch 2x4s, placing the legs about 2 feet apart and put the 21incher on the top. Using the square, try and make it square and even. Drill a pilot hole that goes all the way through and run a 2 -1/2inch screw in it – just one. Square up the other side, drill a pilot hole and run one screw into that. Next, using a shorter piece of wood as a spacer for the bottom, drill your pilot hole and run a screw into that as well. Now you should have two legs with two cross braces held together with four screws.
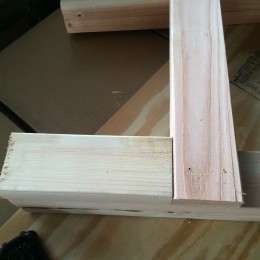
I didn’t take a picture of it because I wasn’t thinking about it, but to make certain the legs are square to save embarrassment when your dad comes to visit, measure from one corner to the other. If both measurements are the same, it is square. If they aren’t, simply nudge it until it is. The first photo is one you should see later, but it makes the point now so I am using it. Once the side pieces are square, run another screw in at each point to make it solid.

Repeat this process so the two sides are finished.
Now it is time to take your rectangles and make a box.
Do the same thing here exactly as you did with the sides, unless you did it wrong. If you did, just burn everything and go buy a prefab work bench and pay someone to assemble it for you. It will be a prefab hunk of shit, but nothing like what you just finished burning.
When putting the front and back pieces on, make sure to overlap the 2×4’s on the side so the 2foot by 8foot sheet of plywood fits nicely with no overhang.

Again, drill a pilot hole and then run only one screw in so you can shift it into being square. Once you have it square, drill another set of holes and put in another screw to hold it. Only run the screws into the legs, not the side braces… well, not yet. This will allow a small amount of movement so it can be squared with the top.
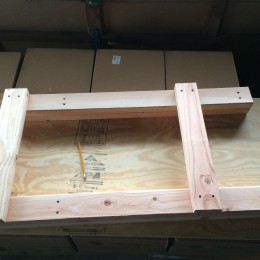
The next step is to put in the inner braces. Because this bench is 8feet long, using two cross braces on the top is a good idea. You don’t have to, but you should. The bottom is a shelf, so one is enough. The top is 8feet, so divided by 3 gives you 32inches spaced evenly. Just make sure to measure and drill pilot holes, if you split the wood now or screw it up, you’ll have to take it all apart and use that extra 2×4.

The easiest step is next, put the bench upright and lay the sheet of plywood on top. It should be square with no spaces. Yes, there is a chance it won’t be. If it is not square, nudge it until it is. Once the top is on top and the bench is square, run one 2inch screw in at one corner and double check the square. This is your last chance so do it right so don’t fuck it up. Next, run another screw in on the other side of the same end so that the plywood is tacked down on one end at two corners. Now you can finish putting the top on, but just don’t do all four corners and then the middle because that can leave gaps. Measure every two feet and starting on the side that is tacked, run screws in on both sides working your way to the other end of the bench. This will tighten the whole thing together.
Once the top is on and screwed down, then run one screw into the ends tacking the 21inch 2×4’s to the 8footers. This last step brings everything together and solid. Now you have a good working table.
If you like, and because you followed these instructions well, you can screw that last 2×4 you didn’t use onto the back as a back stop, and by cutting the corners from the other sheet of plywood you can put the bottom shelf on. Sure, I could write it all out and give you the measurements, but at this point you should be able to figure that out for yourself.

(had to use the panorama setting for this photo, that’s why the legs look a little wonky)
Congratulations! Now you have a good, solid, square, and healthy workbench where you can make cool stuff and do things… or you have a wobbly pile of shit that you can drag out into the yard and burn in effigy. When the fire is out, make sure to pick up whatever screws you wasted so your friends don’t find them with their bare feet, or launch them across the yard with the mower.
Cheers!
that is a sweet table, cost of materials?
One of my other hobbies is fine woodworking. You have a future in this endeavor, when you get really old. In the meantime, your writing style had me laughing at my desk. Well done!
That’s an incredibly serviceable bench and could easily be converted to a beer drinking station. Adds to its value.
A Masonite top sheet helps this go from Budweiser to micro-brau.
materials were between $100-$200. i don’t remember.
Brian, I spent nine years doing fine woodworking before I gave up any opportunity to make ends meet by joining the bike industry.
Goeff, i like to use that shit they make clipboards out of. put a clear glaze on it and it’s tougher than hell.
Looks like you forgot to install the bottle opener and old-timey looking pop-cap catcher collector thing.
Bra fucking vo dude. You just hopefully got somebody to build something that is a day well spent with a busted rib. I like the way u did it too. I hatchet jobbed a few benches then bought a book; now my bench is a source of pride in my garage 9 years later.
While I like this bench…I gotta build me a bike workshop/storage shed first. ARGH.
Seriously the only material item I really lust for in life…is a bike shed. Too many already and the house is damn crowded.
Looks like you forgot to install the bottle opener and old-timey looking pop-cap catcher collector thing.
I like the way u did it too.